So with summer around the corner, I was in the search for new items to update my wardrobe. And one item that really caught my eye was a pair of tassels earrings.
Simple piece of jewelry, that can transform your outfit from day to night! Metallic, with feathers or fringe it doesn’t really matter! They are all beautiful! But did you know that in a few simple steps you can make one for yourself? And the best thing is that, it would be as unique as you are.
* You can also check the video here *
Let’s start with the list of materials you will need.
- 2 big buttons
- 2 tassels
- 2 bell end caps
- 2 headpins
- 2 clip on earrings
Take under consideration, that these items are the ones I used. You can always experiment with different materials and add your own aesthetic to the pieces that you make.
Step 1
Let’s start with the tassels. I bought those from the craft store. Of course there are plenty tutorials online that will so you how you can make one for yourself, but I wanted to make my life, and yours, as easy as possible.
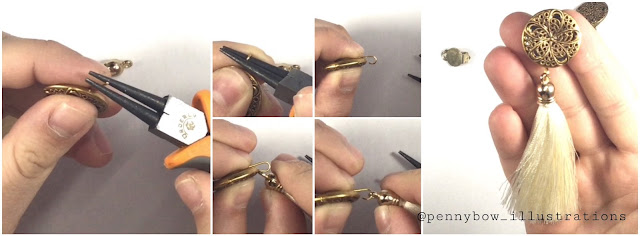
What I didn’t like though, was that jump ring. To remove it I took my pliers and rotated the jump ring, until I came across the opening. Then I put a little pressure to open it so I can remove it completely.
I put a drop of glue inside the bell end cap and put it on the tassel, applied a little bit of pressure and let it dry.
Step 2
While I was waiting for my tassel to dry, I took my button and on the back of it, there where two holes. I put a drop of glue inside one of the holes and then inserted a headpin. Once again, before I moved to the next step, I let the glue dry for a few minutes.
The reason I am doing this, is to secure the headpin that will hold the tassel in place, so it won’t move around as much when I am wearing my earrings.
Step 3
It’s time to unite the button with the tassel. At the end of the headpin I created a loop with my round nose pliers ( you can do it with other pliers too if you don’t have a round one ), passed the tassel through the loop and then pushed it close.
Step 4
Take your glue again and put a drop on the back of the button. Now glue on the clip-on earring and apply pressure for at least 30 seconds and the, for the last time, let everything set and dry ( for a couple of hours would be prefferable ).
Step 5
Get ready to dazzle everyone with your funky and unique accessory. And pleeeaaaase take a photo and tag me on instagram, it would be awesome to see what you have made!
* Come back soon for more *


Δεν υπάρχουν σχόλια:
Δημοσίευση σχολίου